Article
Optimizing Production Flow: Mastering Line and Layout Design


The operational performance of any company in the discrete manufacturing sector is directly dependent on the flow of production lines. The line and layout designs are fundamental elements for achieving efficiency, flexibility, and quality at the lowest possible cost.
Line design includes several improvement themes that will be addressed in this article, including line and layout design, border of line, standardized work, Single Minute Exchange of Die (SMED), and low-cost automation.
Mastering Line and Layout Design for Efficient Production
Line design’s main goals are to implement the one-piece flow concept, minimize waste associated with operator workflows, enable mass customization, and simplify processes before automation.
Implementing a line based on the one-piece flow concept means redesigning the layout and equipment to produce with a continuous flow of parts, ensuring the correct sequence of operations. The goal is to move from batch production to a continuous flow, from raw materials to finished products, without interruptions. The line must be designed to minimize all types of waste. Another challenge is to create a line that is flexible enough to produce several different models with a changeover time as close to zero as possible. Finally, when the line is as optimized as possible, the possibility of automating certain operations to improve ergonomics and efficiency is evaluated.
Fundamentals of Effective Line and Layout Design
The primary focus of improvement in the production flow is line and layout design. The main goals at this phase are:
- Increase productivity;
- Improve the service level (On-Time Delivery and delivery time);
- Reduce process waste and variability;
- Reduce the area occupied by the line;
- Reduce stock at various points in the line;
- Reduce scrap and rework;
- Increase teamwork and versatility.
The priority is to analyze the processes for the various product families and design lines that apply the concept of continuous flow and eliminate all non-value-added operations.
This process goes through a set of stages, of which we highlight the main ones:
- Analysis of quantities by product family and calculation of takt time by family and reference
- Construction of the process vs. product matrix
- Design of the process chart
- Line balancing (Yamazumi chart)
- Design of an efficient layout
- Construction of line mock-up and simulation
- Calculation of the border of line and planning of physical changes
- Definition of information flow
- Implementation of physical changes
- Planning and logistical requirements
- Implementation of visual management and updating of standards
This approach is structured and allows focusing on value-added activities, creating a continuous flow, and eliminating waste. We will detail some of these stages further on.
The importance of the Border of Line in Production
The border of line is the frontier between production and internal logistics, and its design consists of defining the location and containerization of all raw materials and components needed for the line. It is part of the line design but deserves special attention, since the border of line is fundamental for the proper functioning of the line. The border of line must meet four essential criteria:
- All parts must be located to minimize the picking movement of the line’s operators;
- The time required to switch parts from one product to another should be close to zero;
- The decision to restock should be intuitive and instantaneous.
To meet these criteria, the location of the parts, the type of containers, and their flow on the line need to be carefully considered. The designed solutions must always consider not only the productivity of the line but also the efficiency of internal logistics.
Implementing Standard Work Practices for Consistency
Another improvement in production flow is standardized work, which consists of the best-known way of performing a given task to date. It means minimizing the movements of workers and thus optimizing work. By observing the movements of workers on an optimized line, we should get the perception that they are literally glued to the product, doing the work with short and fluid movements, without any effort or stress.
Standard work allows:
- Measuring and improving work methods;
- Reducing execution times;
- Sharing best practices among employees;
- Standardizing by aligning the organization with the best way of working.
Its implementation involves observing the movements of employees and the time they take to execute them, as well as identifying anomalies and difficulties felt by the employee.
The process is generally structured in five stages:
- Definition of improvement objectives
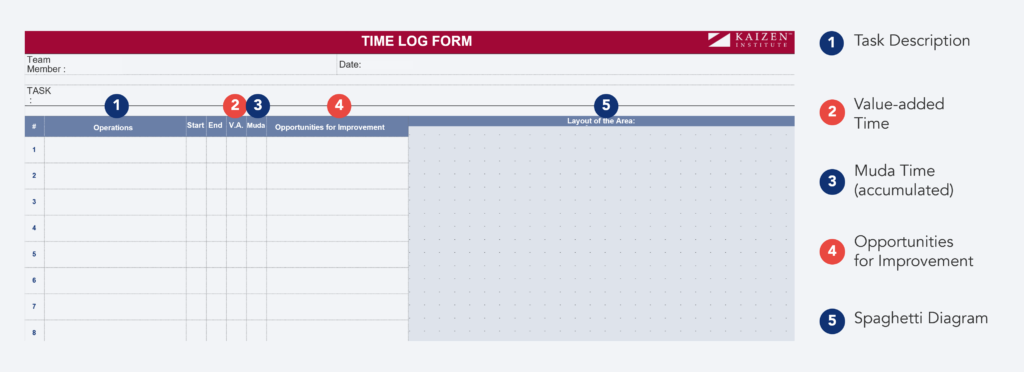
- Work study (spaghetti diagrams, time measurement, and search for muda)
- Implementation of improvements
- Work standardization (simple and visual standards)
- Training of employees
Streamlining Production Flow: Synergizing SMED Flexibility with Affordable Automation
After designing the line, layout, and the border of line according to Kaizen and Lean principles, it’s crucial to consider two other relevant themes: changeover times and automation opportunities.
To address these two points of improvement, two distinct methodologies are used. SMED (Single-Minute Exchange of Dies) seeks to minimize changeover times in reference changes. On the other hand, low-cost automation assesses which operations can benefit from automation and determines the most effective solutions.
Unleashing Production Agility with SMED (Single-Minute Exchange of Dies)
SMED was developed in Japan by Shigeo Shingo for Toyota as part of its production system. The goal of SMED is to reduce the equipment or line setup time, allowing greater flexibility in production, reducing inventory, and increasing market responsiveness.
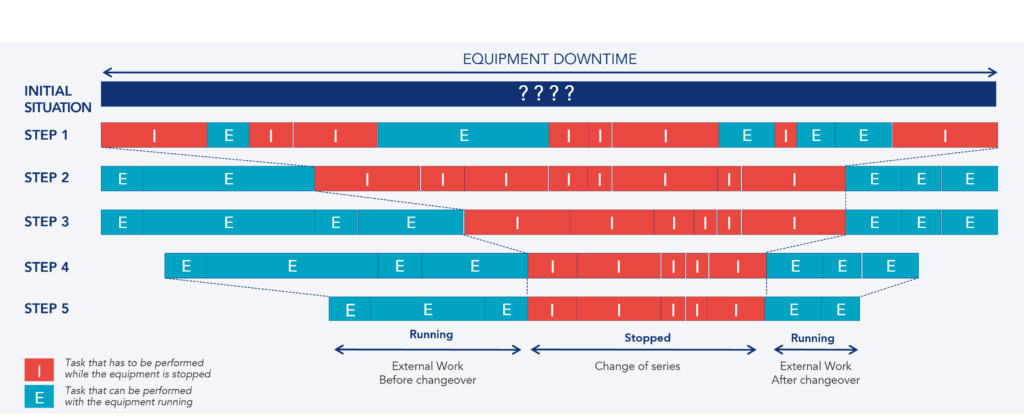
Setup refers to the period between the production of the last unit of the previous series, carried out with the required efficiency, and the production of the first unit of a new series, with the defined efficiency. Within the SMED methodology, there are two important concepts: internal work (change tasks that are done with the machine stopped) and external work (tasks that can be performed with the machine running).
The implementation of SMED goes through the following stages:
- Study of the work
- Separation of internal and external work
- Conversion of internal work into external work
- Reduction of internal work
- Reduction of external work
The advantages of increasing flexibility are immense, and its implications for reducing batch size are one of the main drivers of creating the flow. Zero setup is always the main goal and allows a mixed sequence of different products to flow along the line. This is the case with current car assembly lines, where different models can be seen moving along the line one after the other.
When zero setup is not possible, the goal for SMED is the shortest possible time. A time greater than zero involves working with a batch of similar products before changing or configuring for the next batch.
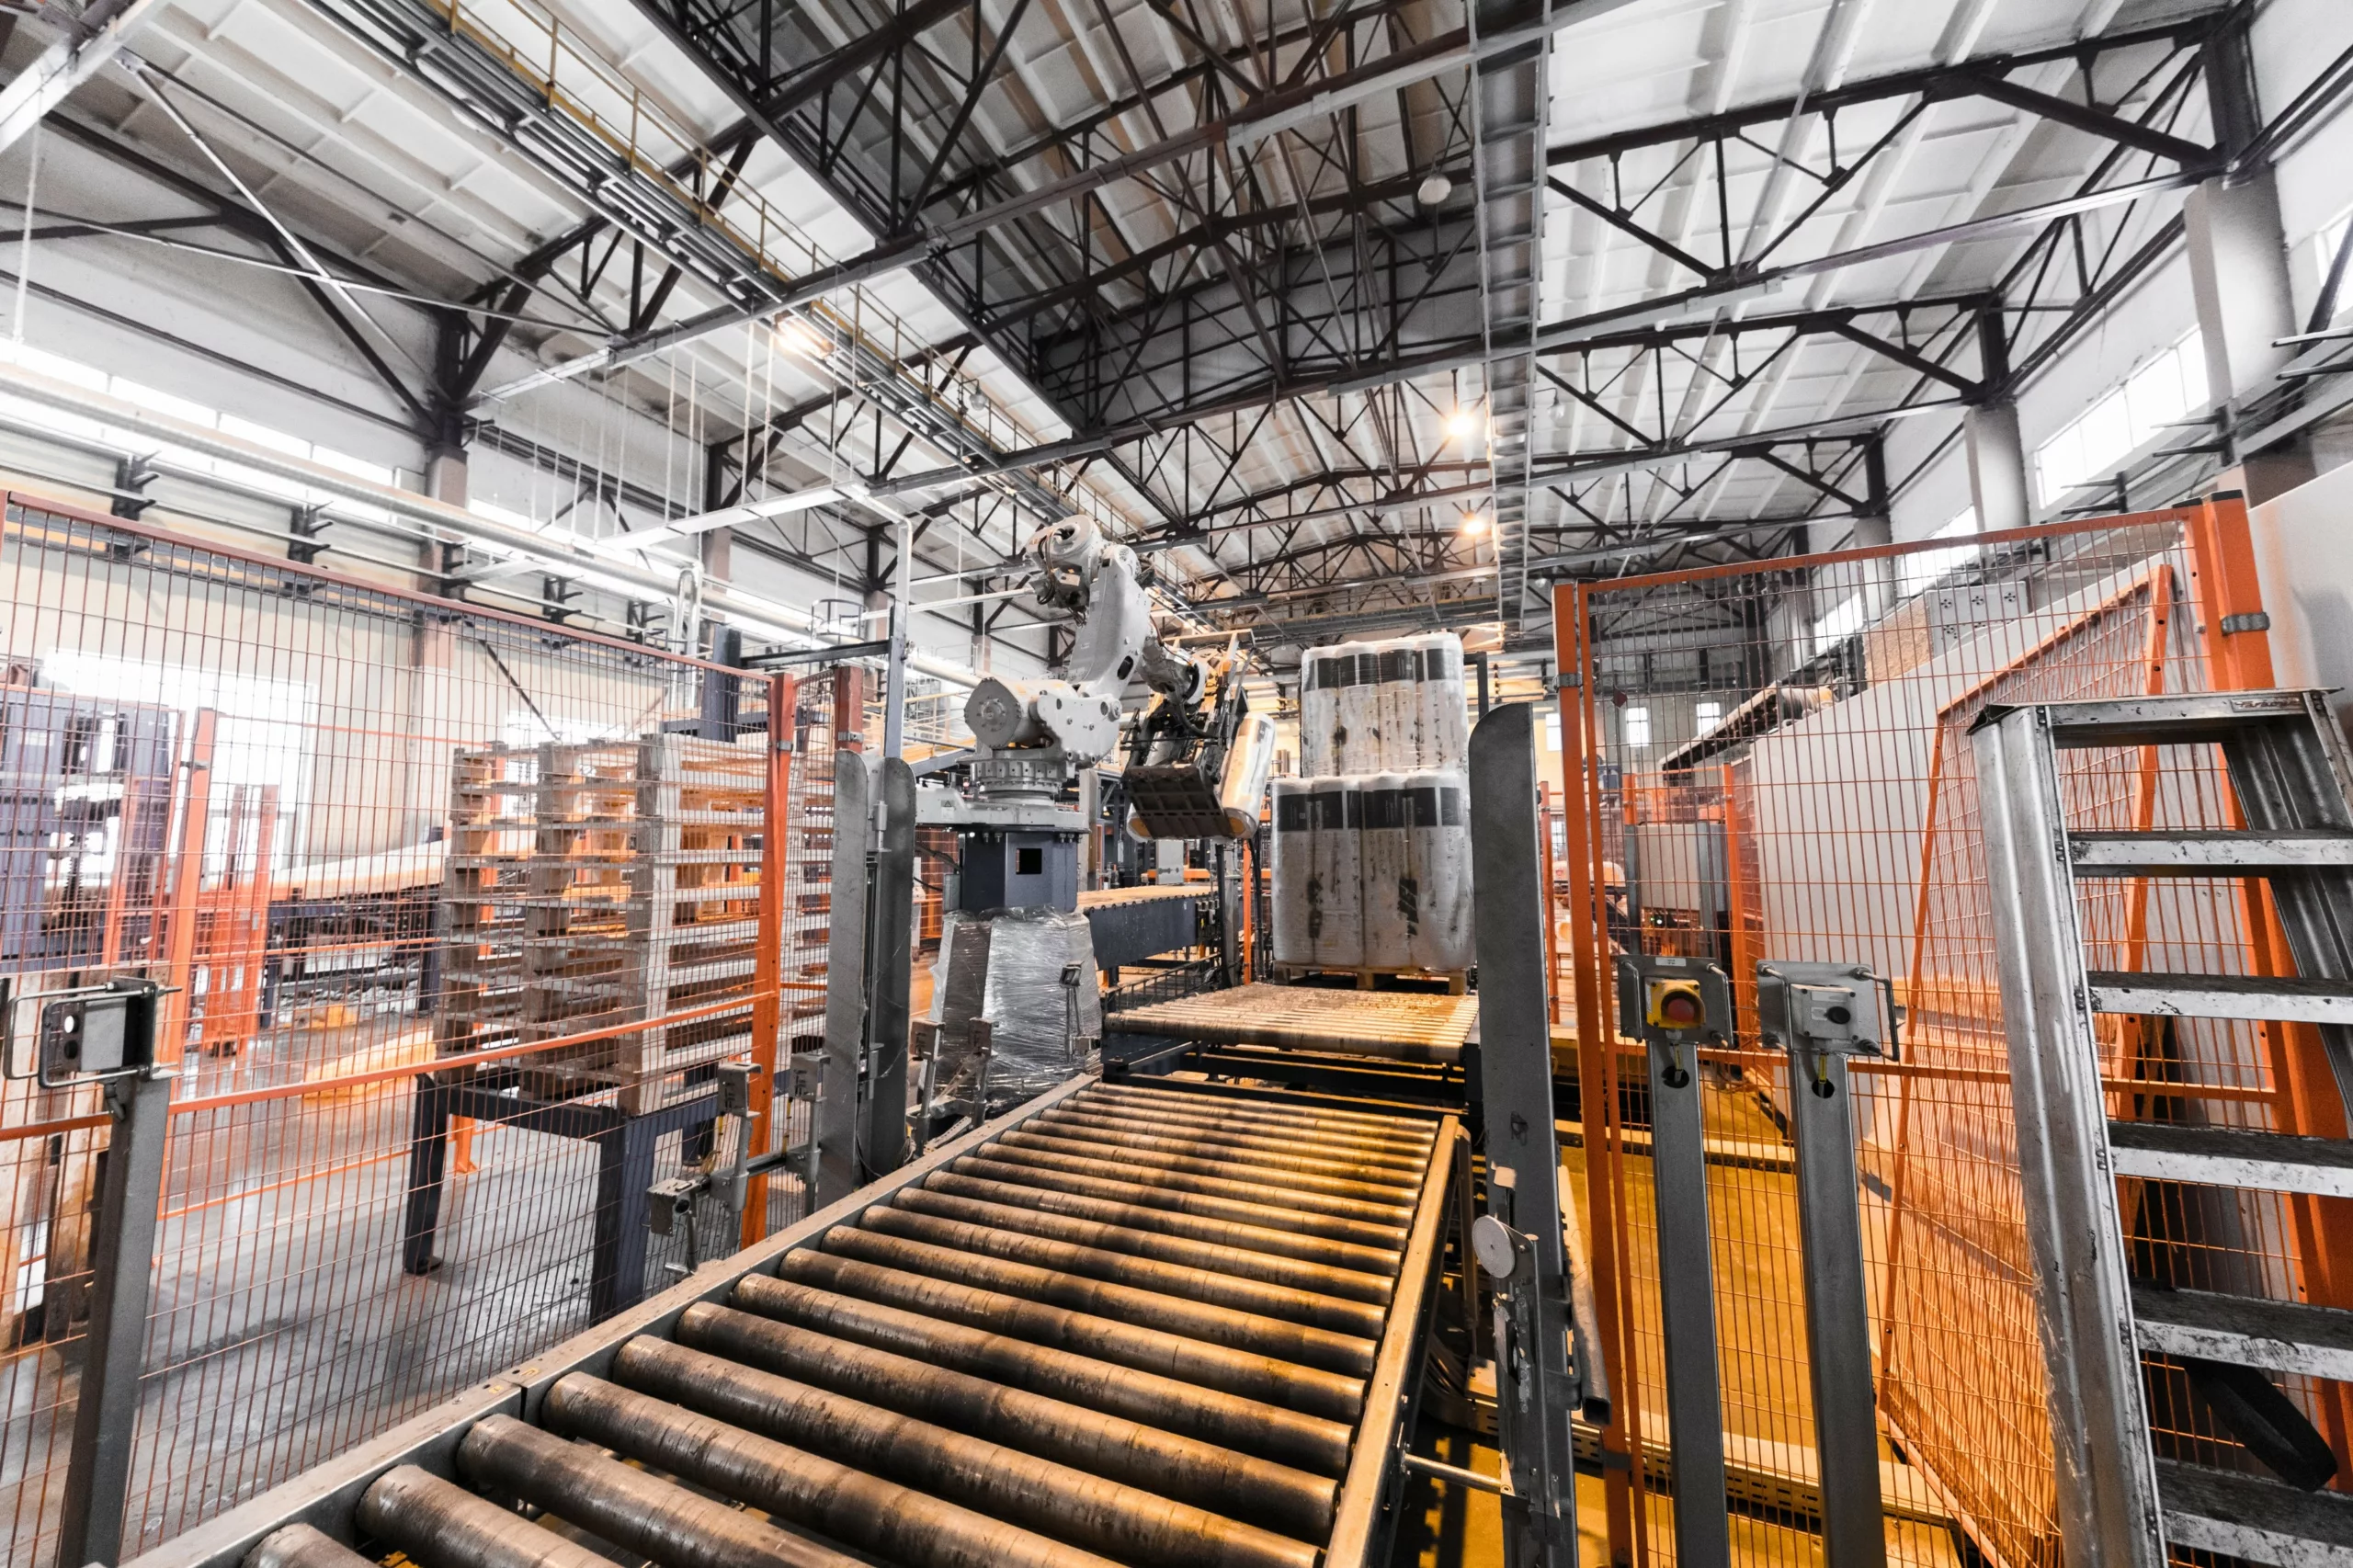
Integrating Low-Cost Automation in Production Lines
After having the line and the border of line optimized, standardized work and setups reduced, it’s time to analyze the possibilities and advantages of automation to achieve greater productivity and ergonomics. As automation can have high costs and not provide a sufficient return on investment, the focus is then on low-cost automation. Thus, the goal is to ensure a level of automation that brings advantages to the production process and, at the same time, ensures a return on investment.
The levels of automation, from manual work to full automation, can be defined in a list of seven degrees:
- Manual Work
- Time-Saving Devices (attachments and fixtures)
- Machine Time Automation (MT)
- MT Automation with Poka Yoke
- Unloading Time Automation
- Loading Time Automation (Robots)
- Transport Time Automation (Transfers)
Going through this list for each operation will reveal many possibilities for low-cost automation. The general methodology usually followed to decide on the automation to implement is:
- Integrate Process Operations into Shojinka Flow Lines (piece by piece flow)
- Check the level of automation of each operation, using the Automation Checklist
- Define automation objectives
- Create implementation plans
Good examples of low-cost automation in unit flow lines are the lines known as Chaku Chaku (in Japanese means “load load”). This type of line is based on the use of a continuous unit flow, allowing the operator to move along the line, loading new parts while the ready pieces are automatically unloaded. The main benefit of the Chaku Chaku system is the optimization of time and movement, as the operator can directly take a piece from one machine to the next without stopping to unload, thus reducing time and effort.
Low-cost automation is generally the final stage of improvement that can bring efficiency to the production process.
Exploring the line and layout design phase
Line and layout design are processes that require a series of steps and strategic decisions. We detail two fundamental phases of this process next. The first phase involves deciding between using several smaller machines or a smaller number of larger machines. The second phase concerns the initial process of characterizing the production and balancing the line.
Comparing Large vs. Small Machine Utilization in Production Flows
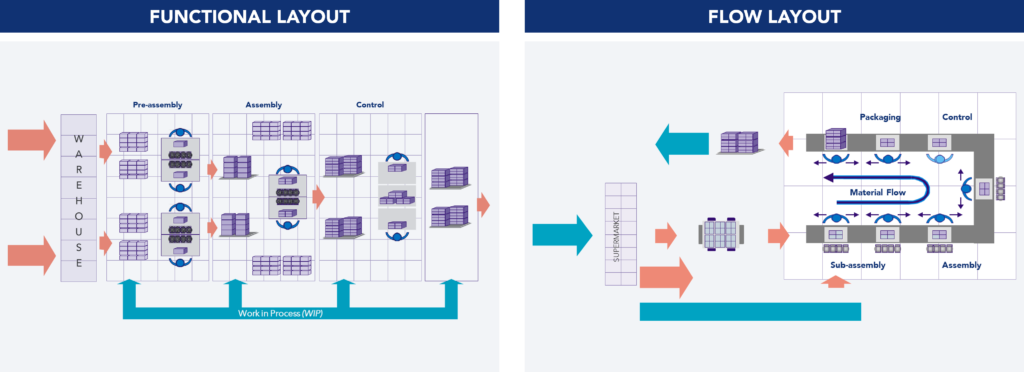
Moving from a functional layout to a flow layout is one of the biggest paradigm shifts in production processes. This change can have a significant impact on all key performance indicators, such as productivity, inventory, lead time, and quality. A question that often generates discussion during this process is the replacement of large and exclusive machines with more and smaller in-line machines.
Another important decision related to the first concerns the number of flow lines needed. There are two alternatives: a single larger line with several employees or several smaller lines. In the single line, the cycle time tends to be short, and depending on the demand profile, only one or more machines may be needed. Alternatively, this short-cycle time line can be divided into several smaller lines that have a longer cycle time.
The advantages of having several smaller lines are evident when considering the implications for launching new models and for increasing the variety of products produced.
Implications of launching a new model:
- Single Line: The time required for preparation and training will affect the production of the current product.
- Several Smaller Lines: The time required for preparation is reduced, and only one line is affected, with no impact on other lines during the initial production period.
Implications of increasing product variety:
- Single Line: More variety implies more changes (changeovers), which will mean a greater loss. The number of operators may need to change constantly. Operators will need to switch positions.
- Several Smaller Lines: The number of changes per line is reduced. The rotation of operators is simplified.
Another advantage of having several lines with longer cycle times is the ease of balancing. For these reasons, instead of automating a large single line to the maximum, it is generally more productive to have several smaller and more flexible lines.
Another important feature of small unit flow lines is what the Japanese call Shojinka. Shojinka means that the line layout is flexible in terms of the number of operators who can work on the line, and their number will define the line’s cycle time. Adding more operators reduces the line’s cycle time and increases the line’s output.
Simple Profiling and Line Balancing Techniques
An important step in line’s design is the initial characterization of the expected production for the line. The design of line and layout should start with a Product-Quantity (PQ) analysis. This is a methodology that reveals the quantities sold in a year for each finished product reference. The analysis should be completed using the ABC method, where A represents the references that account for 80% of the quantity sold, B represents the references that account for the next 15% of the quantity sold, and C corresponds to the least produced references.
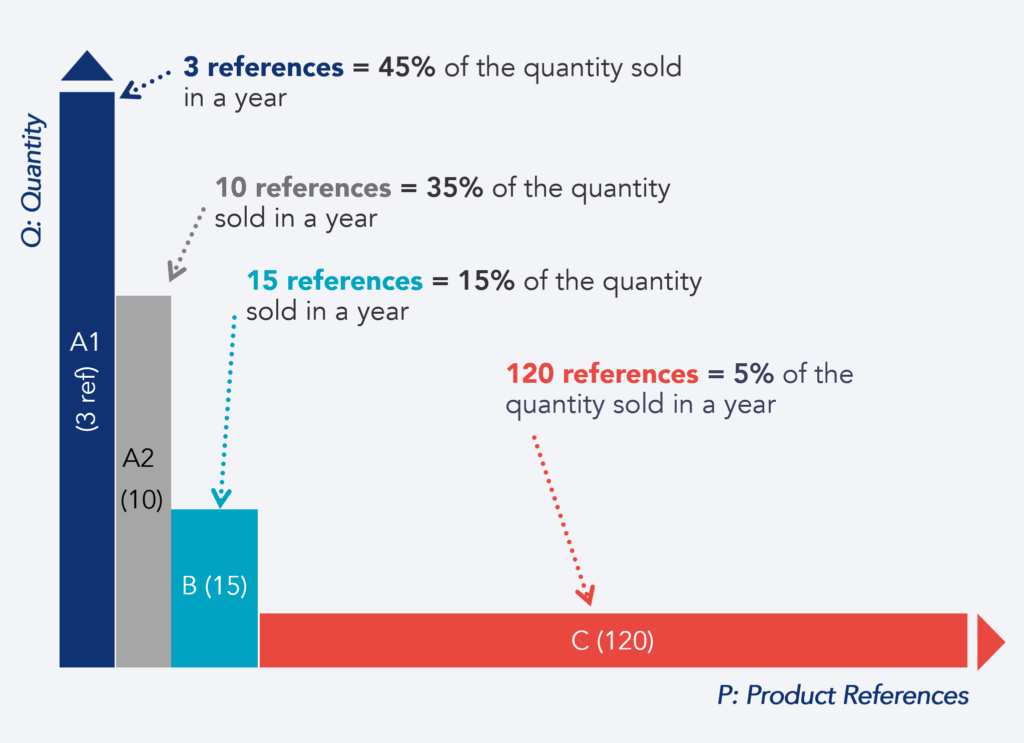
In general, A references are good candidates for semi-automated lines, maintaining unit flow, B references are good options for manual and less automated lines, and finally, C references are the most suitable references for manual lines with a single workstation, flexible for a large number of references.
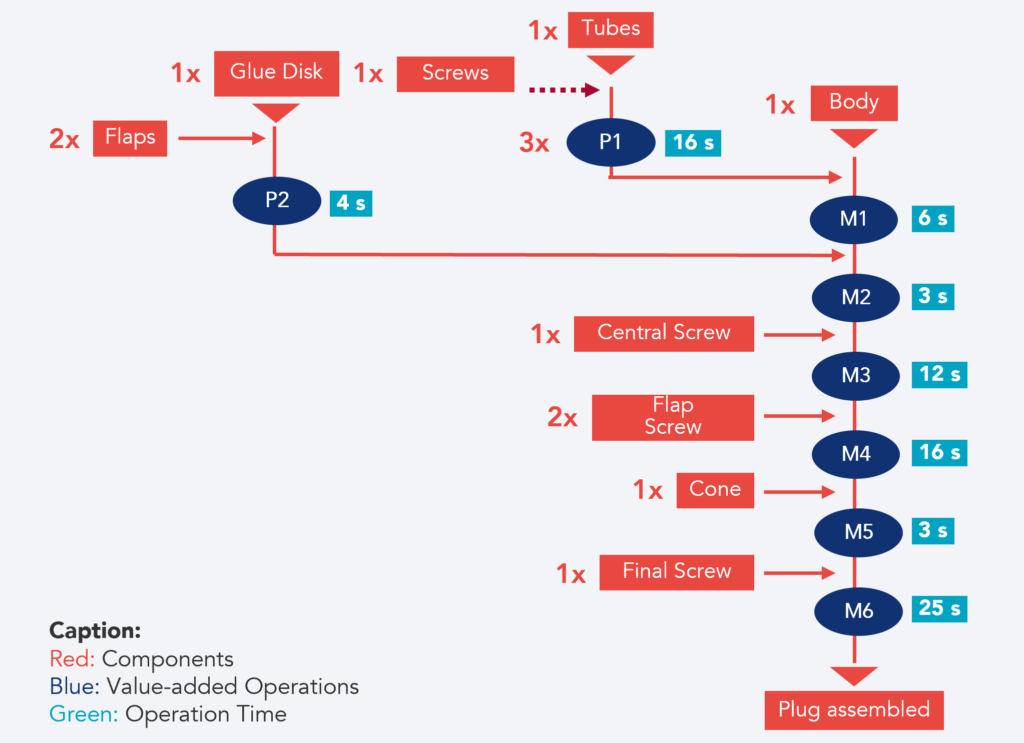
Another important step in the initial phase of line design is the development of process charts and time estimates. A process chart represents a possible order or sequence of operations needed for the assembly or production of a product. It is a simple chart that shows only value-added operations. The process chart provides three types of information: parts or components, value-added operations, and an estimate of the unit value-added time.
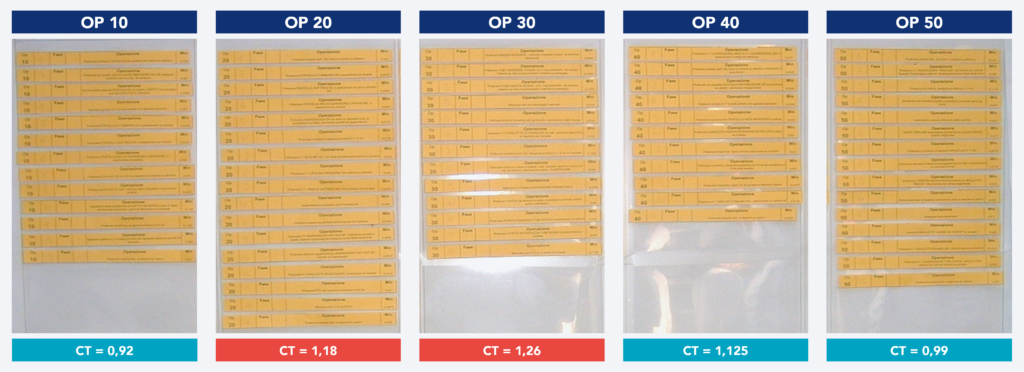
Line balancing is another crucial step in creating flow lines. It involves assigning tasks to each workstation so they are balanced with the line’s cycle time. Each workstation can have one or more workers, but the assigned workers must complete the workstation’s task list within the assigned cycle time.
Line balancing can be performed on the process chart by grouping operations into blocks the size of the cycle time. Subsequently, a visual representation can be made on a chart called Yamazumi, which is a visual method for checking the balance.
Synthesizing the Core Principles of Production Flow Design
To optimize the production flow, line and layout design must align with the Lean Manufacturing principles. We have synthesized twenty principles as best practices for an efficient and flexible production system that responds to demand with minimal waste.
The 20 Important Principles of Layout and Line Design
The twenty fundamental principles for line design are:
- Design lines based on product types, volumes, and life cycles
- Design the layout for unit flow
- Design small and in-line equipment that is easy to maneuver
- Adjust line speed according to customer demand (takt time)
- Eliminate transportation Muda
- Design lines aiming for zero setup times
- Avoid islands of isolated operators
- Separate manual work from machine work
- Synchronize the input with the output of parts
- Design simple and narrow equipment
- Place only the necessary materials within reach (prefer frontal supply)
- Work should flow from right to left (counterclockwise)
- Remember that Karakuri (or subtle maneuverability) is important
- Slow down as much as possible
- Machines should stop when defects occur (Jidoka)
- A mechanical approach is preferable to an electrical one
- Do not automate without careful prior analysis
- Do not work on multiple parts within a single process at the same time
- Simulate with mockups before implementing a solution
- Organize the layout in flow and keep walls free

These principles form the foundation for creating efficient and flexible production lines that meet customer needs with minimal waste, thus contributing to operational excellence.
Still have some questions about production flow optimization?
What is Line and Layout Design?
Line and layout design refers to the sequence of steps for defining the production process. The goal is to define the sequence of operations, improve workflow and minimize waste, implementing a more efficient and flexible production process aligned with the customer’s demand. Good line and layout design can increase productivity, quality, flexibility, and reduce lead time.
What is Border of Line?
The Border of Line is the interface zone between the production line and internal logistics activities. It’s where the materials needed for production are supplied, and where empty containers and finished products are removed from the line. The border of line influences the workflow of both production and internal logistics.
What is Standard Work?
Standard Work is a methodology used to define the most efficient way to produce a product or provide a service. It includes not only the study and improvement of operations but also the development of standards and the training of employees in these standards.
What is SMED
SMED stands for Single-Minute Exchange of Dies, a methodology developed to reduce the time needed to switch from one production series to another. The goal of SMED is to minimize equipment changeover times. By analyzing each step of the changeover process, it’s possible to significantly reduce downtime and ensure an effective startup, increasing operational efficiency. This allows for smaller production lots, less inventory, shorter delivery times, and greater production flexibility.
What is Low-Cost Automation?
Low-Cost Automation involves implementing automation solutions that are cost-effective, meaning they have a good return on investment. It consists of using technology and automation that improve productivity, quality, and safety while minimizing investment. Automation should only be applied after optimizing the production line and each specific operation, ensuring that waste is not being automated.
See more on Operations
Find out more about improving this business area
See more on Discrete Manufacturing
Find out more about transformation in this sector